Mastering Easy Fish Drawing: A Complete Guide For Artists
Table of Contents
- Why Easy Fish Drawing is a Great Starting Point
- Essential Tools for Your Fish Drawing Journey
- The Foundational Shapes to Fish Drawing Easy
- Bringing Your Fish to Life: Details and Expression
- Exploring Different Fish Species for Drawing
- Capturing Movement and Environment in Your Fish Drawings
- Common Mistakes to Avoid in Fish Drawing
- Practice and Patience: The Keys to Mastering Fish Drawing Easy
Why Easy Fish Drawing is a Great Starting Point
For aspiring artists, tackling complex subjects can often lead to frustration and a sense of being overwhelmed. This is where the concept of **fish drawing easy** becomes incredibly valuable. Fish, at their core, are built upon relatively simple geometric shapes, making them an ideal subject for practicing foundational drawing skills. Their streamlined bodies, often symmetrical features, and repetitive patterns like scales provide excellent opportunities to learn about proportion, symmetry, shading, and texture without the added pressure of human anatomy or intricate landscapes. Moreover, the diversity of fish species means there's always something new to explore. From the sleek lines of a tuna to the vibrant patterns of a clownfish, each species offers unique characteristics that can be simplified for beginners and then gradually elaborated upon as your skills grow. This progressive learning curve makes **fish drawing easy** not just a goal, but a journey of continuous improvement and discovery. It allows artists to build confidence, one fin and one scale at a time, before moving on to more challenging subjects. It's a low-stakes way to experiment with different drawing styles, from cartoonish to realistic, and to understand how light interacts with curved surfaces.Essential Tools for Your Fish Drawing Journey
Before diving into the actual drawing process, gathering the right tools is crucial. You don't need an expensive art studio; a few basic items will suffice to begin your **fish drawing easy** adventure. The quality of your tools can certainly enhance the experience, but the most important aspect is that you feel comfortable and confident using them. * **Pencils:** A range of graphite pencils is ideal. Start with an HB pencil for general sketching, a 2B or 4B for darker lines and shading, and a 2H for light, initial outlines that are easy to erase. Mechanical pencils are also excellent for fine details. * **Paper:** Standard drawing paper or even good quality printer paper works well. If you plan to add color, consider slightly thicker paper that can handle markers or watercolors without buckling. * **Eraser:** A kneaded eraser is fantastic for lifting graphite gently without smudging, and a vinyl eraser is great for precise corrections. * **Blender (Optional):** A blending stump or tortillon can help create smooth transitions in your shading, giving your fish a more three-dimensional look. Cotton swabs or even your finger can work in a pinch. * **Reference Images:** This is perhaps the most important "tool." Having clear reference images of various fish species will significantly aid your drawing. Observe their shapes, fin placements, eye positions, and scale patterns. Think about how a bass, known for its aggressive behavior, might have a different body posture than a more docile species. Observing real fish, perhaps even during a fishing trip, can provide invaluable insight into their form and movement.The Foundational Shapes to Fish Drawing Easy
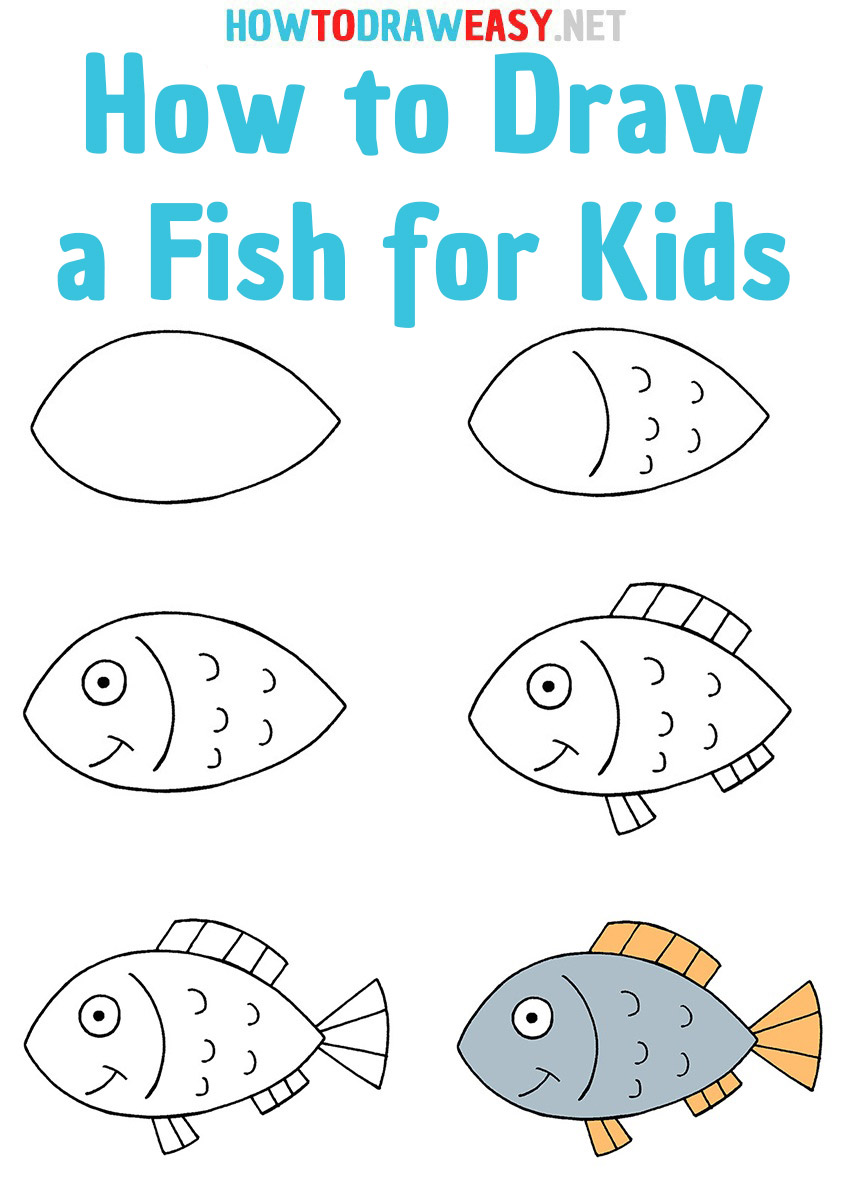
The secret to making **fish drawing easy** lies in breaking down the complex form of a fish into simpler, more manageable geometric shapes. Think of it as building blocks. Once you master these basic shapes, you can adapt them to draw almost any type of fish. This method helps in establishing correct proportions and placement before you get lost in the details.Step 1: The Basic Body Shape
Start with the core of your fish: its body. Most fish bodies can be simplified into one of a few basic shapes: * **An Oval:** This is the most common starting point for many fish, like a goldfish or a common carp. Draw a slightly elongated oval. * **A Lemon/Spindle Shape:** For fish with more tapered ends, like a trout or salmon, think of a lemon or a spindle. This shape naturally suggests the hydrodynamic form. * **A Triangle (with rounded corners):** For flatter fish, like a flounder, you might start with a rounded triangle. Once you have your basic shape, lightly draw a central guideline running from the nose to the tail. This line will help you maintain symmetry and guide the placement of fins and other features. For instance, if you're aiming to draw a fish like those found in the Salmon River, known for its abundant fish species, you'd likely start with a sleek, torpedo-like shape. Remember, these initial lines should be very light, as they are just guides and will be erased later. Don't press too hard; the goal is to sketch, not to commit.Step 2: Adding Fins and Tail
With the body established, it's time to add the elements that define a fish's movement and identity: its fins and tail. Each type of fin serves a specific purpose and has a characteristic shape. * **Tail Fin (Caudal Fin):** This is the primary propeller. It can be fan-shaped, forked, rounded, or pointed. Sketch a simple shape at the end of your body guideline. For a fast-moving fish, like a salmon or steelhead (often caught using fly fishing techniques), the tail will likely be forked and powerful. * **Dorsal Fin:** Located on the back, this fin helps with stability. It can be a single fin, or two separate ones. Draw a triangular or rounded shape on the top of the body. * **Pectoral Fins:** These are like the fish's "arms," used for steering and braking. They are typically located just behind the gills, often resembling small wings. * **Pelvic Fins:** Situated on the underside, usually below or behind the pectoral fins, these also aid in stability and steering. * **Anal Fin:** Located on the underside, near the tail, this fin also helps with stability. When adding fins, pay attention to their size and how they attach to the body. They should flow naturally from the main form. For example, the powerful fins of fish in the Rogue River, where understanding the best times to fish can significantly increase your chances, would be drawn with a sense of strength and purpose. Keep these shapes simple at first; you can refine them later.Bringing Your Fish to Life: Details and Expression
Once the foundational shapes are in place, it's time to add the details that transform a generic outline into a recognizable and lively fish. This is where your observation skills really come into play. Even with **fish drawing easy** methods, attention to detail can elevate your artwork.Step 3: Eyes, Gills, and Mouth
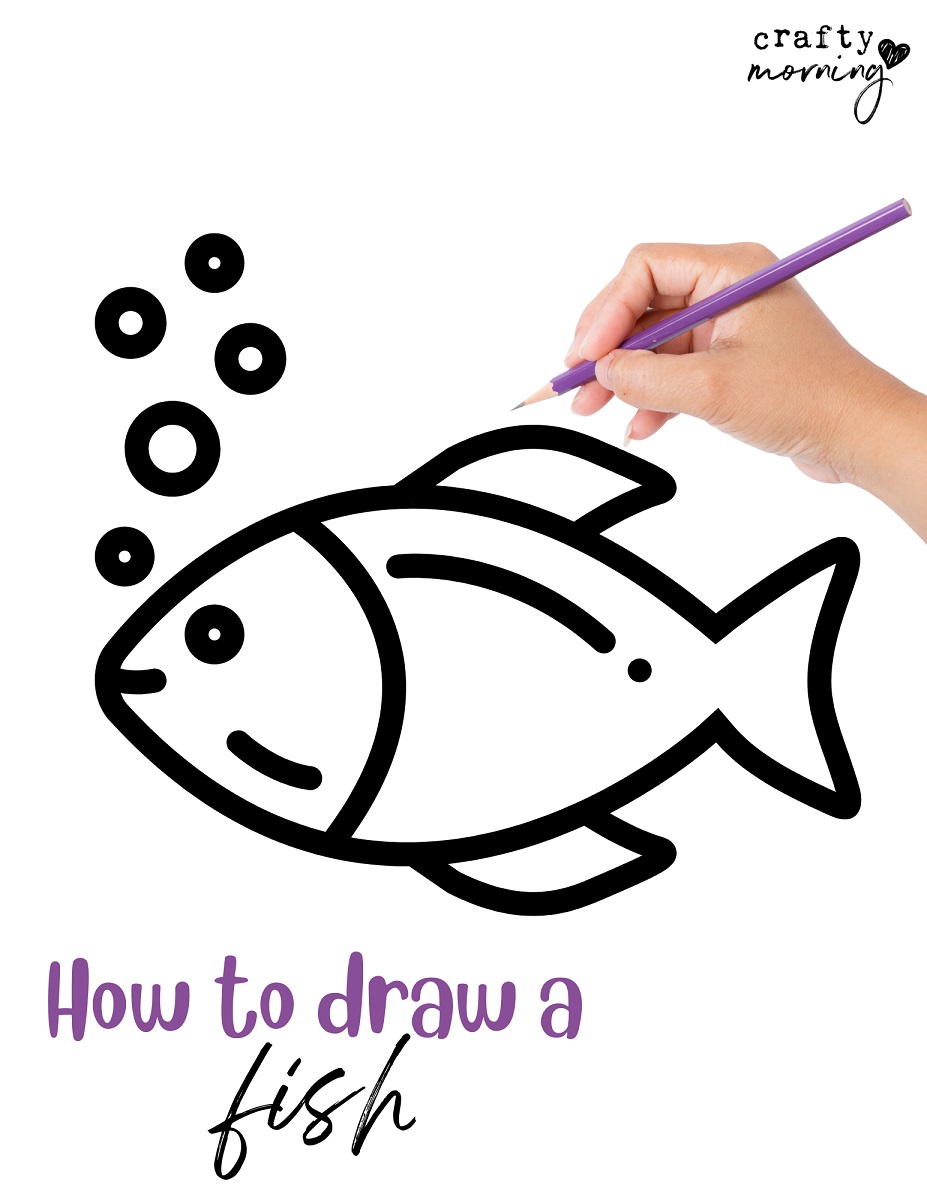
These features are crucial for giving your fish personality and a sense of life. * **Eyes:** A fish's eye is usually round and relatively large in proportion to its head. Place it on the side of the head, slightly above the midline. Add a small highlight to the eye to make it look wet and alive. The placement and size of the eye can convey a lot about the fish's character. * **Gills:** Gills are typically located behind the eye, covered by an operculum (gill cover). Draw a curved line or a series of overlapping curves to indicate the gill flap. The shape of the gill opening can vary greatly between species. * **Mouth:** The mouth can range from a small, upturned opening to a large, predatory jaw. Observe your reference image carefully. Is it a bottom-feeder with a downturned mouth, or a surface-feeder with an upturned one? The mouth's expression can suggest if the fish is aggressive, like certain freshwater anglers' favorites, or calm. Remember to erase your initial light guidelines as you refine these features, leaving only the confident lines of your fish.Step 4: Scales and Texture
Adding scales and texture is what truly brings your fish drawing to life. This step can seem daunting, but it doesn't have to be overly complex for **fish drawing easy** techniques. * **Scales:** Instead of drawing every single scale, which can be tedious and overwhelming, suggest them. You can use overlapping "C" or "U" shapes, starting from the head and moving towards the tail. Vary the size and spacing slightly to create a more natural look. For a simpler approach, use a series of short, curved lines or dots to imply texture without drawing individual scales. The way light hits the scales can create a shimmering effect, so consider adding subtle shading. * **Lateral Line:** Most fish have a lateral line, a sensory organ running along the side of their body. Draw a subtle line from the gill cover to the tail. This adds anatomical accuracy. * **Fins:** Add fine lines to the fins to suggest the delicate rays that support them. This gives them a more realistic, translucent quality. By focusing on the overall impression of texture rather than drawing every minute detail, you can achieve a convincing result with less effort.Exploring Different Fish Species for Drawing
Once you're comfortable with the basic steps of **fish drawing easy**, challenge yourself by exploring different species. Each type of fish offers unique characteristics that can inspire new drawing approaches and expand your artistic vocabulary. * **Bass:** These fish are known for their aggressive behavior and are a favorite among freshwater anglers. When drawing bass, focus on their robust body, large mouth, and often spiky dorsal fin. Their powerful build suggests strength and activity, especially in warmer months when they are most active. Bass fishing in Florence, for example, is particularly good during these times, offering a chance to observe them in their natural, dynamic state. Capturing this energy in your drawing can make it more compelling. * **Salmon and Steelhead:** These migratory fish are sleek and powerful. When drawing salmon, emphasize their streamlined body, forked tail, and often distinct markings. These fish are often caught using fly fishing techniques, especially during the summer months when insect activity is high. This context can inspire drawings of fish leaping or swimming against currents, highlighting their incredible agility. The Salmon River, with its abundant fish species and scenic surroundings, offers an unforgettable experience for anglers, and equally for artists seeking inspiration from its rich fishing culture. * **River Fish (Rogue River, Coquille River):** Rivers like the Rogue River and Coquille River host different species of fish throughout the year. Timing is crucial when fishing these rivers, and similarly, understanding the seasonal patterns of the river’s fish species can significantly increase your ability to draw them accurately in their natural environment. Consider how the environment influences their form – a fish living in fast-moving water might be more streamlined, while one in calmer waters might have a broader body. By studying various species, you'll learn to adapt your basic fish shape and details to create a wide array of aquatic life. Remember, the state has specific rules governing the types of fish you can catch, the seasons, and the daily limits. While not directly related to drawing, understanding these aspects can deepen your appreciation for the fish you're depicting and their natural habitats.Capturing Movement and Environment in Your Fish Drawings
A static fish drawing can be accurate, but adding a sense of movement and placing it within an environment truly brings it to life. This elevates your **fish drawing easy** from a simple outline to a dynamic scene. * **Indicating Movement:** * **Curved Lines:** Instead of a perfectly straight body, introduce a subtle curve to suggest the fish is swimming or turning. A gentle "S" curve can imply graceful motion. * **Trailing Lines:** Add faint, quick lines behind the fins or tail to indicate water displacement or speed. * **Fin Position:** Show fins in different positions – some slightly bent, others extended – to convey active movement. Think about how a fish would propel itself forward or brake. * **Adding an Environment:** * **Water Lines:** Simple wavy lines can suggest water. Vary the thickness and spacing to indicate depth or current. * **Bubbles:** A few strategically placed bubbles can add a sense of underwater realism. * **Underwater Flora:** Simple shapes for seaweed, rocks, or pebbles on the "riverbed" can create a natural habitat. Consider the environment of the Oregon coast, where you might find different types of fish and aquatic plants, influencing the true flavor of local recipes. * **Light and Shadow:** Think about how light filters through water. Adding subtle shadows beneath the fish or on the "riverbed" can give your drawing depth and dimension. This also applies to the fish itself; fresh fish, whether grilled, baked, or smoked, shows different light reflections than live fish, but understanding light on form is key. Even simple environmental cues can transform your drawing. The goal is to imply the setting rather than drawing every detail, making it easier to integrate into your **fish drawing easy** approach.Common Mistakes to Avoid in Fish Drawing
Even with a focus on **fish drawing easy** techniques, certain pitfalls can hinder your progress. Being aware of these common mistakes can help you correct them quickly and improve your artwork more efficiently. * **Ignoring Basic Shapes:** Rushing straight into details without establishing the fundamental body shape and proportions will almost always result in an awkward or disproportionate fish. Always start with light, simple forms. * **Lack of Symmetry:** While fish aren't perfectly symmetrical, they are very close. Often, beginners struggle to make both sides of the fish look balanced. Use your central guideline diligently and flip your paper or look at your drawing in a mirror to spot imbalances. * **Flatness:** Drawing a fish as a flat, two-dimensional shape. Remember that fish are three-dimensional creatures. Use subtle curves, overlapping shapes (like gills over the body), and basic shading to give your fish volume. * **Over-detailing Too Soon:** Trying to draw every scale or fin ray before the main structure is solid. This leads to frustration and a messy drawing. Build up details gradually. * **Generic Fish:** Drawing a fish that looks like no specific species. While starting with a generic fish is fine, try to observe and incorporate characteristics of real fish as you progress. This makes your drawings more interesting and believable. * **Stiff Poses:** Fish are fluid creatures. Avoid drawing them in rigid, unnatural poses. Even a slight curve can add life. * **Ignoring References:** Relying solely on memory can lead to inaccuracies. Always use reference images, even for "easy" drawings. Observing the specific rules governing types of fish and their natural behaviors, much like anglers aged 12 and older are required to have a valid Oregon fishing license to understand regulations, can greatly inform your drawing. This attention to detail and factual accuracy builds trustworthiness in your artistic representation. By being mindful of these common errors, you can significantly accelerate your learning process and create more compelling fish drawings.Practice and Patience: The Keys to Mastering Fish Drawing Easy
Like any skill, mastering **fish drawing easy** requires consistent practice and a good deal of patience. You won't draw a perfect fish on your first try, and that's perfectly normal. The journey of learning to draw is about incremental improvements, celebrating small victories, and learning from every attempt. * **Draw Regularly:** Even short, daily sketching sessions can make a huge difference. Consistency is more important than long, infrequent sessions. * **Experiment:** Don't be afraid to try different pencil pressures, shading techniques, or even different types of paper. Experiment with various fish species and poses. * **Learn from Mistakes:** Every "mistake" is an opportunity to learn. Analyze what went wrong and how you can improve it next time. * **Seek Inspiration:** Look at other artists' work, watch nature documentaries about fish, or even visit an aquarium. The more you observe, the richer your visual library will become. Think about the vastness of aquatic life, from the fish in the Coquille River with its crucial timing for fishing, to the broad array of species globally. * **Enjoy the Process:** Drawing should be a joyful activity. If you find yourself getting frustrated, take a break. Come back to it with fresh eyes. Remember, the goal is not just to draw a fish, but to enjoy the creative process and to develop your artistic skills. Whether you're drawing for personal enjoyment, to illustrate a story, or just to pass the time, the ability to make **fish drawing easy** is a rewarding skill that will bring you closer to the natural world. If you have more fish (drawings) than you can "eat" (use), perhaps you can share them, just as one might vacuum seal extra fish to preserve them. The process of creation and preservation applies to both! In conclusion, embarking on the journey of **fish drawing easy** is an accessible and rewarding artistic endeavor. By breaking down the process into simple shapes, focusing on key details, and practicing consistently, anyone can learn to create beautiful and lifelike depictions of aquatic creatures. From the aggressive bass to the graceful salmon, the underwater world offers endless inspiration. Keep observing, keep sketching, and most importantly, keep enjoying the creative flow. We encourage you to share your fish drawings in the comments below, or explore other articles on our site for more drawing tips and inspiration!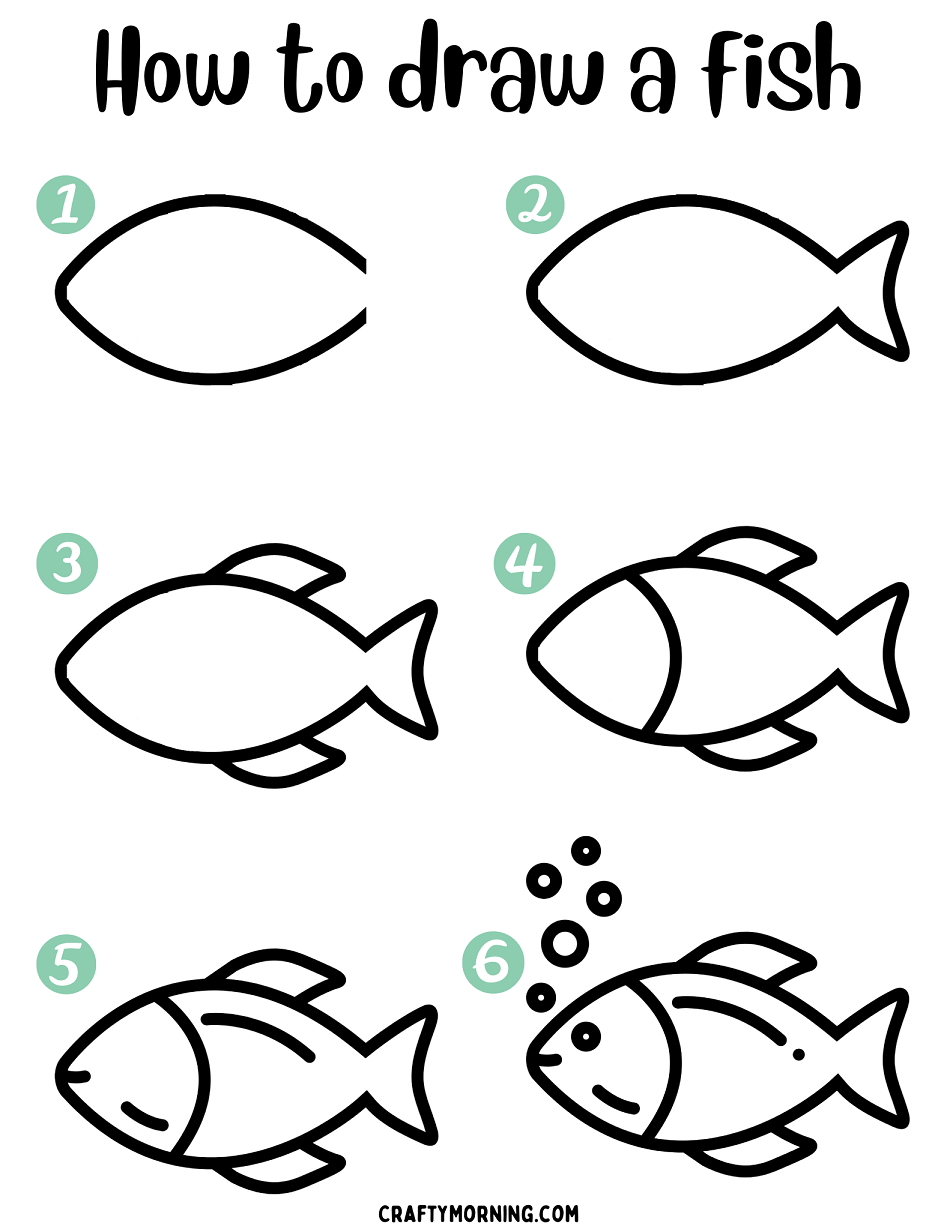
Easy Fish Drawing- Step by Step Printable - Crafty Morning
How To Draw Easy Fish Fish Drawing Step By Step For Kids Drawing Clock
Fish Drawing Easy Cartoon at Charles Reinhardt blog
